Importing data into Fintesk with spreadsheets
You can import your data to Fintesk from XLS, XLSX and CSV spreadsheet files, allowing you to add deals, organizations, persons, products, notes and activities all at the same time.
Note: Importing data into Fintesk is only available for users with the correct "global permission" enabled.
Before getting started, check out our article on how your data is organized in Fintesk. It’s important to understand how the data you’re importing will fit into the Fintesk data structure.
Download our sample spreadsheet here for a practice import.
You can also read more about CRM data import and export in this post.
Getting ready for an import
Before you import, consider the data you’re adding to Fintesk and format your spreadsheet accordingly.
- Are you trying to import a list of contacts (persons and organizations?)
- Do you want to import contacts and create an open deal for each one?
- Do you want to import contacts, open deals, and create activities for those deals?
- Do you want to import contacts, open deals with activities, and attach notes?
- Or open new deals for contacts that already exist in Fintesk?
Some spreadsheet formatting tips:
- Remove formulas – Use a fresh spreadsheet without any formulas. If you have a spreadsheet that uses formulas or data-linking to generate the contents of a cell, copy the data from your spreadsheet into a fresh sheet without the formulas.
- One tab per spreadsheet – Your spreadsheet should only have one tab containing data. If your spreadsheet has more than one tab, copy and paste the tabs into individual files and import them one at a time.
- No special symbols – Your spreadsheet can’t have symbols for numeric or monetary fields. For example, a column for deal value should just include the number “100” and not the symbol “$100”.
- Spreadsheet size limit – There is no maximum limit on the number of spreadsheet columns, but the maximum file size is 50MB, with a limit of 50,000 rows per spreadsheet.
Mandatory fields
When importing data to Fintesk from a spreadsheet, include the mandatory fields for each item. Each mandatory field needs a separate column in your spreadsheet mapped to the corresponding field in Fintesk.
Note: If you don’t import your data with the mandatory fields, it will create no items, and a skip file will be generated.
To import | You need these mandatory fields |
Deals |
|
Persons |
tip Note: Email and phone are recommended for avoiding duplicates |
Organization |
tip Note: Address is recommended for avoiding duplicates |
Products |
tip Note: Product Code is recommended for avoiding duplicates |
Notes |
|
Activities |
|
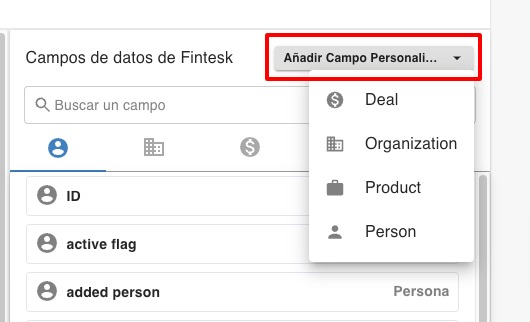
Custom fields
If your spreadsheet has data for deals or contacts that isn’t covered by default fields, add a custom field before importing so your data has somewhere to be mapped.
For example, “job title” is not a default field in Fintesk. To include this information in your import, create a custom person field, then map the spreadsheet column to the newly created field. We recommend a text or single option field.
You can also create custom fields during the mapping stage of your import. Learn more about custom fields in this article.
Initiating your import
Step 1: Upload your file
Go to “...” (More)> Import data > From a spreadsheet. Click 'From a spreadsheet' and select the file you intend to import. Fintesk supports Excel (.xls and .xlsx) and .csv files.

Step 2: Mapping
To import your data to Fintesk, map each column in your spreadsheet to the relevant icon and field in the mapping step. You can hover over the icon to see what type of data it refers to in Fintesk.
The auto-recognition feature will automatically match the column header to the fields in Fintesk. Any unrecognized fields must be dragged from the Fintesk fields (right) to their appropriate spreadsheet columns (left). Use the search bar to find Fintesk field names more easily.

Note: You can learn more about mapping in this article or advanced mapping in this article.
Once you are finished mapping, click “Next.”
Step 3: Preview and finish
In the next window, choose what to do if duplicates are found in your spreadsheet. If Fintesk detects a duplicate record in your spreadsheet or Fintesk data, it will consolidate this into one entry. You can learn more about how Fintesk detects duplicates during importing in this article.
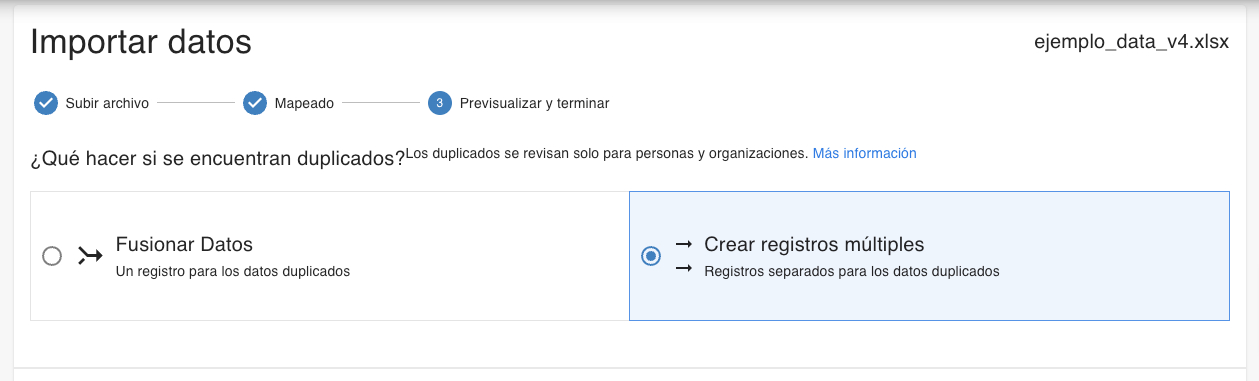
This page also shows a preview of your data after the import.

Once you’ve previewed your import, select “Start import.”
After your import
After your import, you will see a confirmation page with an overview of the imported data.